Thursday, November 06, 2008

L1v3 M35H L337 H4x0rZ

In case you aren’t already persuaded that the Live Mesh team are a bunch of L337 H4x0rZ, check out the ids of entries in the Profiles feed.

id title
G3N3RaL GeneralProfile
480u7Y0U AboutYouProfile
k0n74C7Inf0 ContactProfile
wORK1nfo WorkProfile
1n7eRE572 InterestsProfile


I believe this also demonstrates their far-reaching commitment to open web standards and the new generation of social apps.  Or perhaps the hidden message is “so easy, even script kiddies can hack it!”

You can see this for yourself by firing up the Live Framework Resource Browser (LivefxResourceBrowser.exe from the SDK tools) and drilling down into Cloud LOE > Profiles.

On a slightly related note, as I was digging around with the Resource Browser I discovered that the following two URL styles appear to be interchangeable.

https://user-ctp.windows.net/V0.1/cid-1234567890123456789/Profiles

https://user-ctp.windows.net/V0.1/email-abc@live.com/Profiles

I’m not sure if the email identifier format is stable enough to bank on, but it’s convenient for typing or tweaking URLs by hand.  Does anyone know of other equivalent identifier types in Mesh resources?

Wednesday, November 05, 2008

Live Mesh Resource Script Demo

In the Live Framework Programming Model Architecture and Insights session, Ori Amiga (standing in for Dharma Shukla, previously a WF architect) demos a Live Mesh resource script that runs in the cloud.  The script creates a folder on the Live Mesh desktop and downloads two images from external resources, placing them in the newly created folder.

I couldn’t find this sample on the web, so I recreated it from the session video.  You can download the demo project here.

You may need to touch up the references to Microsoft.LiveFX.Client.dll, Microsoft.LiveFX.ResourceModel.dll, and Microsoft.Web.dll since they live under C:\Program Files (x86)\ on my 64-bit box and are probably under C:\Program Files\ if you’re running 32-bit.

At first, my demo threw an error trying to run the following line:

script.RunAtServer(creds);

After investigating with Reflector, I discovered that RunAtServer() hard-codes a default script URL of https://user.windows.net/V0.1/Script/ which needs to be changed to https://user-ctp.windows.net/V0.1/Script/ .  You can override this either by calling an overload of RunAtServer() that takes a URI, or by creating an App.config file and adding the following line in the <appSettings> section.

<add key="ScriptUrl" value="https://user-ctp.windows.net/V0.1/Script/"/>

I chose to use the appSettings solution since that is what Ori must have used in the demo.

I really would prefer ScriptUrl to be exposed as a property on ResourceScript<> that appSettings/ScriptUrl maps into rather than having to specify the URL either in config or in each method call.  My philosophy is that you should always be able to do in code what you can do in config.

I’m looking forward to playing more with Live Mesh resource scripts, documented here.  Right now they feel a bit convoluted to create programmatically, but they appear to be designed to put a friendlier layer on top such as an Oslo DSL or a “resource workflow designer”.

Tuesday, November 04, 2008

Dissecting Live Mesh App Packages

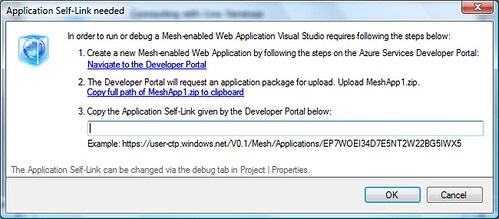
After bundling Flash inside a Mesh app, I took a closer look at what Visual Studio is doing behind the scenes.  The Mesh-enabled Web Application template creates a project with a .meshproj extension.  A .meshproj file has several important properties.  <OutputName> is the prefix used to name the resulting zip file.  <DebuggerCodeType> is set to either JavaScript or Silverlight, depending on whether you create an HTML/JavaScript or a Silverlight Mesh app.  <ApplicationUri> is the Application Self-Link that you are supposed to copy-and-paste from the Developer Portal after you upload the zip file, as instructed below:
MeshAppSelfLinkPrompt

A .meshproj file also imports $(MSBuildExtensionsPath)\Microsoft\Live Framework\v1.0\Microsoft.LiveFramework.targets which first ensures that your project has an index.html and then zips up the output directory, naming the zip file using the OutputName you specified.

You don’t need to use Visual Studio to do this.  You can easily create your own Mesh app package by hand.  At a minimum, your zip file must contain:

  • index.html
  • Manifest.xml
  • Logo.png

Index.html is the entry point for your app.  Logo.png is the icon that will be displayed on your desktop and should be a 32-bit 256 x 256 png.  Manifest.xml is your app manifest. A detailed description of the manifest configuration options is documented here.

I believe you can bundle anything you want in the zip file, although Microsoft supposedly runs an antivirus scan on the contents, and there may be additional checks for inappropriate content.  Anything in the zip file gets downloaded to your computer when the app is installed on your local desktop.  This is why my Flash app was able to run offline.

You might be able to use this to “install” an XBAP application that can run offline.  To make it cross-platform, you could bundle the XBAP together with a “down-level” Silverlight version and choose which one to display based on what the client supports.  If download size is a concern, it might be possible to put the executables in a DataFeed instead of in the app zip file and selectively sync only the version you want to display, but I haven’t dug into DataFeeds enough yet to see if this kind of per-client sync filtering is possible.  Of course you would be working against the built-in versioning management if you did this (updates should only occur when the user closes and re-opens the app).

Ok, so uploading a zip file sounds nice and simple, right?  Then why does Visual Studio want me to copy-and-paste the Application Self-Link URI?  It turns out that if you use Visual Studio you only upload the zip file once per app.  Once you’ve uploaded the zip and told Visual Studio about the Self-Link URI, Visual Studio will use that URI for subsequent deployments to upload the individual files directly.

If you watch Visual Studio using Fiddler (you’ll need to configure HTTPS support) you will see it query the Mesh for the resource feeds of your app, do HTTP DELETEs for each resource that was inside your zip file, and then do a bunch of POSTs to upload each item in your project.  That seems a bit risky.  What if Visual Studio dies before reposting all the resources it deleted?  It seems like updating an app by manually uploading a zip file is a safer, slightly more atomic operation.  It’s no big deal right now, but once real production apps are being upgraded, something more robust would be nice.  I’m guessing we will see more explicit versioning, giving the user the choice of whether or not to upgrade.  If such a feature is added, the direct app resource update trick might be useful for bypassing an explicit upgrade prompt.

The next time your Live Mesh client (MOE.exe) talks to the cloud, it will download the new versions of the files into your local app cache (AppData\Local\Microsoft\Live Framework Client\Bin\Moe2\MR\).  For some reason I was unable to pinpoint the download traffic with Fiddler, so I can’t say for certain whether individual files are downloaded or if they are zipped up first.  It appears older versions of files aren’t removed.  This is probably to support the explicit user upgrade scenario in the future, but it seems like they could still be doing more cleanup.

I’m really curious why Visual Studio updates individual app resources rather than following the documented workflow of uploading a zip file with the updates.  Anyone know?

Update: I posed this question in the comments on Danny Thorpe’s blog and he responded:

On your second question, the reason we upload files individually instead of uploading the zip file is because the REST API we’re uploading to doesn’t handle zip files. The dev portal that you manually upload your zip file to unzips the file and uploads the individual bits to the production storage. The Live Services REST APIs that the VS tools use to upload files goes (as far as I know) straight into the production storage.

In a nutshell, the dev portal that you see in your web browser is just a front end to the actual cloud service. VS doesn’t upload to the dev portal UI, it uploads to the cloud itself.

Keep in mind that the long side trip of manual steps that you currently have to go through to get a new app created and uploaded to the cloud will all be going away as soon as the cloud APIs to create and provision a new application are implemented.

He also explains the debugging versioning scheme in the comments, and I suggest you go read it for more great details.

One other related insight from Danny comes from this forum thread:

Our goal for the VS tools is to do all development against the local LOE and let the local LOE deal with sync'ing things back to the cloud.  All the parts needed to do that aren't ready yet, so for the PDC CTP we redirected the VS tools to upload and debug mesh apps in the cloud.

This makes the current chattiness (and the “glue” dialog box) much more acceptable to me since the end goal is to use the local REST API rather than the cloud API.

Update 2: Danny has posted a thorough response to this post.  There’s lots of great information there, so I won’t quote it all here.  One “aha” moment for me was the concept of separate debug application resources.  He also confirms that the “glue” dialog will be going away soon.  Go read it for details.  Thanks, Danny!
Friday, October 31, 2008

Live Mesh + Flash == Adobe AIR

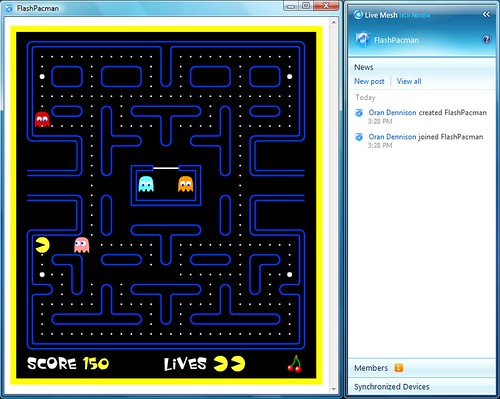
MeshFlashPacman

Yes, that’s an Adobe Flash app running as a Live Mesh app, and it was easy.  Feel free to install the app and try it out for yourself.

First I snagged a pre-existing .swf file since I am not a Flash developer.  Then I created a new Visual Studio project using the Mesh-enabled Web Application template that comes with the Live Framework Tools for Visual Studio.  I added the .swf file to the project with the default build action of Content and copied-and-pasted the object embed tag into the body of index.html.  Then I ran through the usual Ctrl-F5 steps to upload and deploy the resulting zip package and boom, it just worked!  I was able to use the app in the browser in my Live Desktop, and an icon for the app magically appeared on my Windows desktop that let me run the app offline, “outside the browser” (I believe MeshAppHost.exe actually hosts a chromeless IE browser control).  I’m guessing you would also get the same desktop experience using the Mac Tech Preview.

If I were an actual Flash developer, I would take it to the next step and call the Mesh APIs using the Microsoft.LiveFramework.js library.  That should “just work” as ActionScript, right?

If Flash for Windows Mobile appears before Silverlight for Windows Mobile, this could make for a very interesting deployment option when combined with the Live Mesh client for Windows Mobile once it supports Mesh apps.  Three days ago Amit Chopra announced that a public CTP of Silverlight 2 for Mobile will be available in Q1 of 2009.  I’m guessing this will coincide with MIX09 which starts March 18.

The skeptics might say hosting Flash in a Live Mesh app is an unsupported hack that Microsoft will quickly disable, but I don’t think so.  David Chappell’s whitepaper Introducing the Azure Services Platform specifically states:

“A mesh-enabled Web application must be implemented using a multi-platform technology, such as Microsoft Silverlight, DHTML, or Adobe Flash. These technologies are supported on all of the operating systems that can run the Live Framework: Windows Vista/XP, Macintosh OS X, and Windows Mobile 6.”

I think this is a very cool option that highlights the fact that Microsoft designed Mesh to be an open platform with the broadest possible reach.

Update:

A whitepaper just published by a Program Manager and an Architect on the Live Framework team contains the following quote that confirms Flash support:

What application types are supported by the Live Framework?

The Live Framework supports client side applications of all types including the following application
types on Windows to interact with Client or Cloud versions of Live Operating Environment:

  1. Browser based apps (Javascript, Flash and Silverlight) on IE, Firefox and Safari
  2. Managed desktop applications written using WPF, WinForms, or other languages like Python,
    Ruby, or Perl. All you need is an HTTP Client stack in your programming environment of choice.
  3. Traditional native Win32 applications (all you need is WinInet/IXmlHttpRequest and MSXML)

Additionally, on the server side, you can use PHP, WCF, ASP.Net or any other server-side language or
technology to interact with the cloud version of the Live Operating Environment.

Friday, April 18, 2008

LINQ to NHibernate in LINQPad

LINQPad is like Query Analyzer for LINQ queries. Out of the box it does LINQ to SQL, LINQ to Objects, and LINQ to XML. Wouldn't it be nice if it did LINQ to NHibernate as well? Here's how. The setup process is a bit tedious, but you only need to do it once.

Get a working copy of LINQ to NHibernate

If you haven't done so already, use Subversion to check out LINQ to NHibernate from https://nhcontrib.svn.sourceforge.net/svnroot/nhcontrib/trunk/src/NHibernate.Linq and build it. If you run NHibernate.Linq.Tests.exe, the MbUnit AutoRunner will run through all the tests and display an HTML report of the test results. I get 134 passing tests and 31 failing tests which is to be expected since not all of the LINQ features have been implemented yet, but if you check the commit logs you will see this is actively being worked on. Note that you will need a standard Northwind database (get it here if you don't already have it), you will need to create a new database named Test, and you may need to modify the connection strings in App.config to match your setup.

Add assembly references

Once you've got LINQ to NHibernate working, open LINQPad and press F4 to bring up Advanced Query Properties. Add references to NHibernate.dll, NHibernate.Linq.dll, and the assemblies containing your entities and your data context. In this example, those would be Northwind.Entities.dll and NHibernate.Linq.Tests.exe respectively. Note that when you click Browse to add an assembly reference, you will need to enter *.* in the File Name textbox and press enter to change the file type filter from *.dll to all file types so you can add the Tests.exe reference.

Import namespaces

While you're in the Advanced Query Properties dialog, go to the Additional Namespace Imports tab and enter namespace imports for NHibernate.Cfg and NHibernate.Linq.Tests.Entities. You may want to click the "Set as default for new queries" button in the lower left so you don't need to set up these assembly and namespace references the next time you start LINQPad. Alternatively, when you save a LINQPad .linq query file it will save these references and reload them the next time you open the .linq query file. This can be handy for switching between different databases and data contexts.

Resolve connection string config issues

If you provide NHibernate with connection strings from App.config, LINQPad will not be able to automatically pick these up so you will need to tweak your hibernate.cfg.xml file to contain the actual connection string instead of a named connection string reference. This involves renaming "connection.connection_string_name" to "connection.connection_string" and changing the value to the connection string found in your App.config. If you don't want to mess up your real hibernate.cfg.xml file, make a copy and modify the copy.

Bootstrap the NHibernate data context

In LINQPad, change the query type to "C# Statement(s)" and paste the following code, modifying the path and name of your hibernate.cfg.xml file as necessary:

var cfg = new Configuration().Configure(@"C:\NHibernate.Linq\NHibernate.Linq.Tests\bin\Debug\hibernate.cfg.xml");
var factory = cfg.BuildSessionFactory();
var db = new NorthwindContext(factory.OpenSession());

var q =
from c in db.Customers
where c.City ==
"London"
orderby c.CustomerID
select new { c.CustomerID, c.CompanyName };
q.Dump();

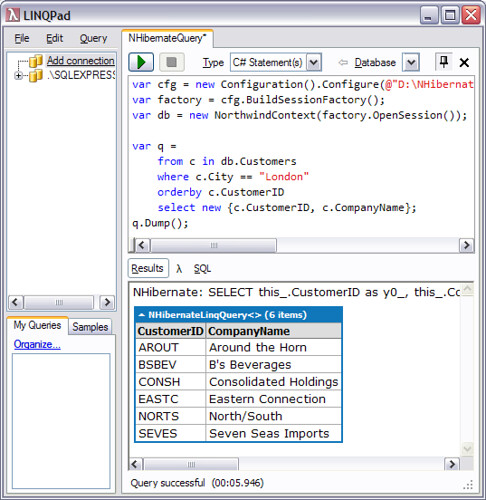
Press F5 or Ctrl+E to run this and you should see the following result:


NHibernateLINQPad


The SQL generated by NHibernate is displayed above the results due to the show_sql=true line in hibernate.cfg.xml. Be sure to save this "query template" as a LINQPad .linq file so you don't have to go through this process again!

Tuesday, December 25, 2007

WCF Message Size Tester

Recently on the WCF Forum someone suggested that WCF wasn't able to send messages larger than 2 GB, so I wrote up a little example to disprove this theory.  I was able to send a 500 GB message with no problems, and I'm guessing that if I let it run long enough, there will be no problem sending up to 8 million terabytes, the maximum size of a WCF message (Int64.MaxValue).

The main "trick" to sending messages larger than 2 GB is to change the binding's TransferMode from its default of TransferMode.Buffered to TransferMode.Streamed.  Besides enabling you to send messages with minimal in-memory overhead, this also allows you to set MaxReceivedMessageSize larger than 2 GB without WCF throwing an exception when it tries to build the channel stack.

It's worth noting that MaxReceivedMessageSize is enforced by WCF regardless of whether the TransferMode is Buffered or Streamed.  The same is true for SendTimeout and ReceiveTimeout, so these still need to be adjusted accordingly.

Stream-based messaging in WCF is typically accomplished by using service operations that take a Stream as the only parameter, return a Stream, or both.  So what kind of Stream should I ask WCF to send for me?  I wanted my example to run as fast as possible, which means I didn't want it to be touching the disk in order to send or receive messages.  And I don't have enough memory or address space to buffer a 500 GB MemoryStream.  So I created a little hack stream implementation whose Read method leaves the byte buffer untouched and simply returns the appropriate number of bytes "read".  This results in sending 500 GB of zeros. :-)

Download the example code here.

Tuesday, December 11, 2007

Rhino Mocks Quick Reference

Last week I gave a presentation on mock objects for Software Professionals of Alaska.  Once the PowerPointy hand-waving was out of the way, I illustrated the concepts with code examples using Rhino Mocks.  I thought I was well-versed in Rhino Mocks before I started, but in the process of preparing the presentation I realized there was a lot that I didn't know or had forgotten.  So I distilled all the main facts and features down into a 3-page quick reference of tables and example usage.  You might argue that 3 pages makes it a "slow reference," but regardless I still think it's useful to see all the basics stripped down to the bare minimum.  Much of the content came from the Rhino Mocks Documentation Wiki, so look there first if you need more details on a particular feature.

So without further ado, I present the Rhino Mocks 3.3 Quick Reference.  It includes:

  • the 3 different record/replay syntax styles
  • 4 types of mocks, 7 if you include MultiMocks
  • expectations and setup
  • methods
  • properties
  • events
  • exceptions
  • delegates
  • custom behavior
  • assert messages
  • ordered and unordered
  • repetition
  • the full set of argument constraints

Feedback is quite welcome.  Enjoy!